
Home Decor
Can You Patch A Door?

Doors with a hollow core are more popular and less expensive than those with a solid wood core, and they’re also far more brittle and easily damaged. While fixing holes in the doors or ugly scratches seems challenging, you could have them fixed in as little as a day or two. Your door may look as good as new with just a little work to repair any dents or scratches before applying a fresh coat of paint.
HOW TO PATCH A HOLE OR CRACK?
Carrying or Door Repair Sydney or patching a door requires several different steps, among which are as follows:
- REMOVE ANY DAMAGED WOOD FROM THE AREA SURROUNDING THE HOLE
There could be several stray splinters and pieces near the edges of the hole based on how the door was damaged. Instead of attempting to fix these, use a tool knife to remove any harmed wood until you are left with a hole that is clean and free of sharp edges.
- PUT PAPER TOWELS IN THE HOLE
Even though the paper towels won’t make the Modern Kitchens Sydney door sturdier or fix it, they are a quick, simple, and inexpensive solution to keep the insulating foam in position while it dries. Squish paper towels into the bottom and along the sides of the crack or hole, you’re trying to patch.
- USE EXPANDING FOAM INSULATION TO PLUG THE OPENING
The spray container for expanding insulation foam has a long nozzle on top. Start spraying by inserting the nozzle into the crack or hole in your door. Any surplus foam will extend through the door’s face and out the hole in the door after expanding to fill up the space inside the door.
- ALLOW THE INSULATING FOAM TO DRY OVERNIGHT
Drying completely is required before further work, such as cutting or sanding, may be done on the insulation foam after it has been used to plug the hole or crack. Wait 4–5 hours, or ideally overnight, to ensure the foam dries completely.
- USE A UTILITY KNIFE TO CUT OFF THE EXTRA FOAM
To flush insulation foam with the door face, place a utility knife just above any insulation foam sticking out. Cut away any extra foam by running the blade down the door’s surface and trimming it so that it is no higher than 2.5 mm below the door’s surface.
- APPLY A COAT OF AUTO-BODY FILLER FOR A STURDY REPAIR
Fill the hole in your door with a mixture of two parts auto-body filler and one component hardener catalyst. A putty knife’s edge can be used to spread and push the solution over the hole to fill any voids and bring it roughly to a flush finish with the drywall.
- USE SPACKLE TO FILL THE HOLE FOR A FASTER REPAIR
Spackle can be used in its place if auto-body filler is unavailable. Scoop up some spackle with a putty knife, then cover the gap in your door. To spread the spackle as evenly and smoothly as you can over the door, use long, fluid strokes.
You can then wait 1 hour for the surface to dry. Whether you carried out the project with an auto-body filler product/spackle, it can take approximately an hour for the compound to dry entirely. You need to give it that much time to dry and then use the door.

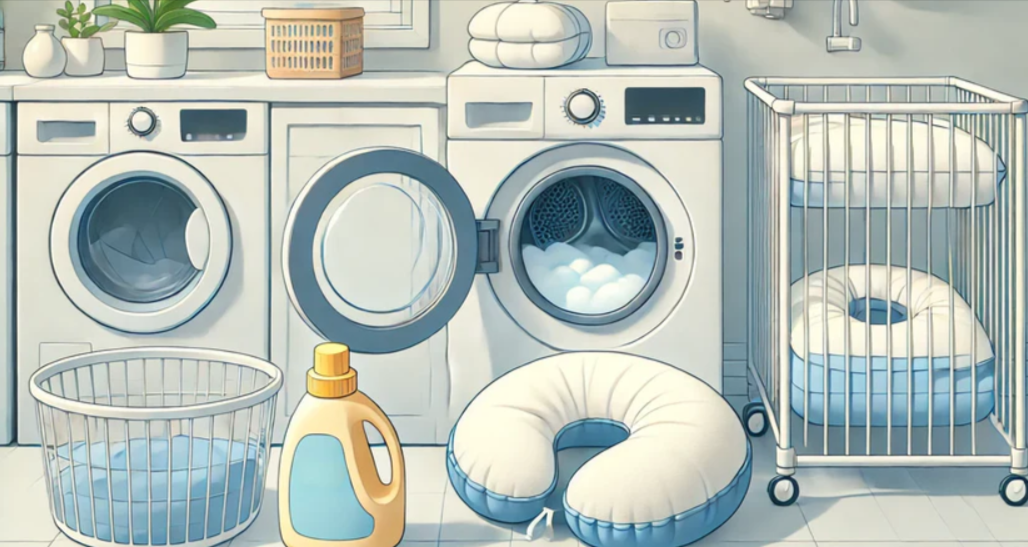
Because it plays an essential role in providing babies with an enjoyable place to eat and eat, it is important to know how to wash a nursing pillow as fast as you can.
Spitting up from babies, mom nursing with leaky milk even blow-outs that surprise you and appear on moms who aren’t while nursing babies can all result in nursing pillows becoming extremely dirty quickly.
This guideline for cleaning a nursing pillow using the washing machine has details on how:
- Slipcovers must be washed in the machine and spot-clean.
How often should it be cleaned
- The process of cleaning your breastfeeding pillow the first time could be an emotional experience. in addition, some books will recommend that you only the area where you need to clean your nursing pillow.
- If you own an automatic front loading machine it is possible to have your nursing pillow that is filthy cleaned and look new and clean without much of the hassle or effort.
Tips for Keeping Your Nursing Pillow in Good Condition
If you’re looking to prevent your beloved feeding pillow from causing any harm take a look at the suggestions below.
- It is also possible to use an swaddle blanket for your nursing pillow. These blankets are even more comfortable and breathable, which makes them suitable for use on warm or cool days.
- After eating, look over the area for wet areas.
- After each meal After each meal, thoroughly clean the area
- Buy at least two different nursing pillows in the event that one becomes unusable while the other one is being cleaned
Instructions for Cleaning a Nursing Pillow
- Try cleaning your nursing pillow with an upright washing machine
- Check your fabric pillow for nursing and determine if there’s any specific instructions for washing your pillow that are that are printed before washing it.
- Use a mild laundry detergent that is safe for infants. The cover of the nursing pillow must be removed. This is essential since your baby’s face will be communicating immediately with your pillow for breastfeeding.
- Use a front-loading machine to wash pillows for nursing.
- Find areas that have been very filthy.
- Apply a small amount baby-safe laundry detergent on the areas that are soiled and let it rest for a few minutes.
- Cleanse your nursing pillow, follow up with the wash powder to wash the rest of your clothes.
- Select a bike with a resistance that is low
- It is recommended to use warm water to wash your clothes.
- Dry with a soft cycle using an unheated setting.
- To maintain the shape of your pillow to keep it in shape, put wool drying balls in your dryer along with it.
Get at least 2 pillow covers, so you can switch between them while the other is being cleaned. We all know the difficulty to keep up with washing with a baby.
If your pillow isn’t being used, hang an oversized receiving comforter on it to stop the formation of stains. The process of putting a comforter that you received in the washing machine is more efficient than washing your nursing pillow on a regular basis.
The best preventative maintenance is washing or spot-cleaning your pillow for breastfeeding every few months.
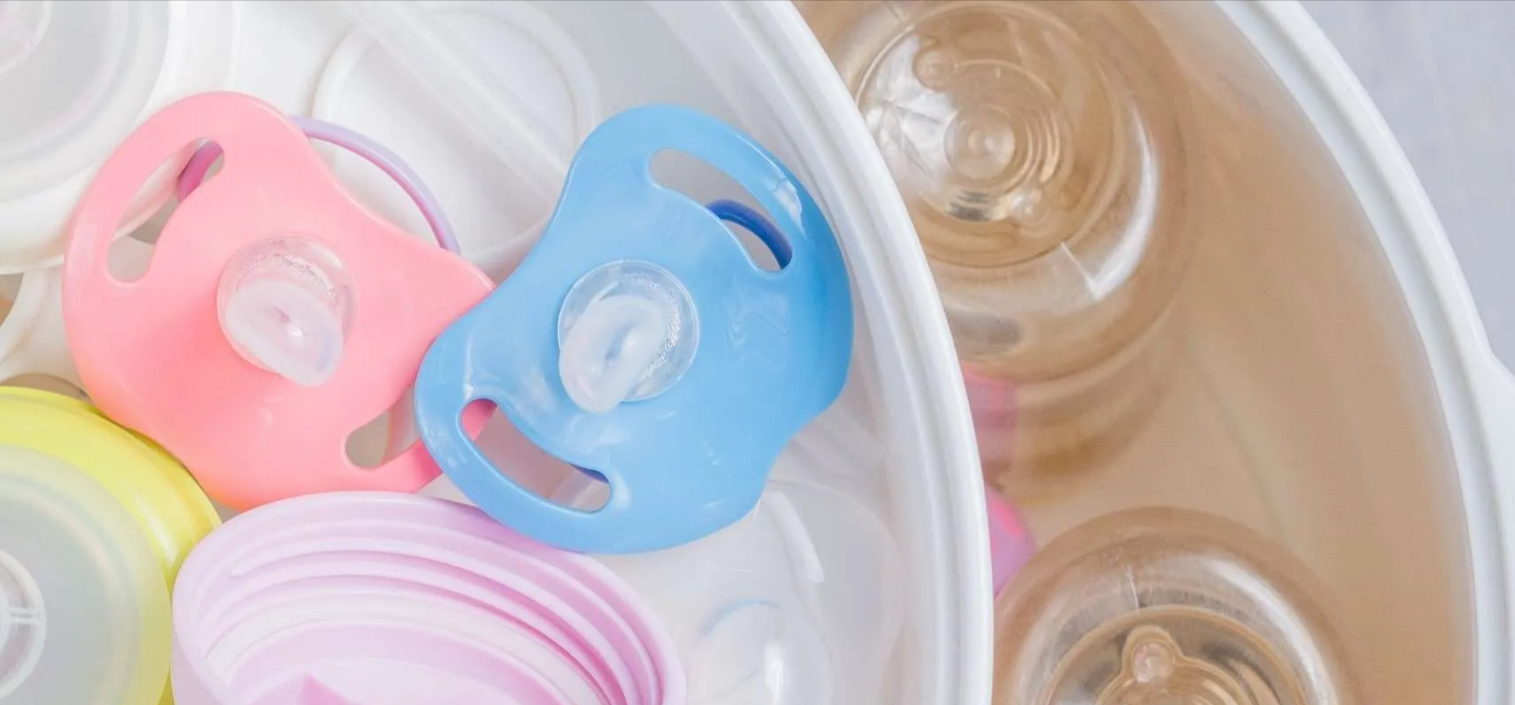
Pacifiers play an vital role in calming the baby or soothing the infant. Many children always have one in their mouths since they become accustomed to it. If it is important for your infant, you have to ensure that you take care of the baby’s pacifier. It must be cleaned and keep it in good condition so that your baby doesn’t get sick. Here’s how to clean and sterilize the pacifier at home.
Before we begin to look at the procedure for cleaning and disinfecting the pacifier consider the things you will need to do the job:
- A new sponge
- Dish soap
- Pan
- Microwave sterilizer
- Plastic bags made of plastic
- It is important to first wash them before beginning the sterilizing process. In order to do this, first fill the sink with soapy water that is warm. If the sink isn’t clean, then utilize a bowl to make sure you fill it with soapy water.
- It is now time to take care to clean it using the aid with a sponge from the kitchen. However, ensure that you’re always using a new sponge.
- After you have finished cleaning, you can begin taking a close look at the pacifier. It is important to look for any cracks on the Pacifier. If the pacifier is in good shape, take, then you need to determine whether the pacifier is in good condition or not. If you notice it’s sticky, then it’s the right time to replace your old pacifier by a new one.
- Then, you can clean it by making use of a sterilizer or hot liquid. If you’re doing it by hand, you must boil the water to its maximum temperature, and after that, add the pacifier the water and let it simmer for five minutes.
- If you’re making use of a sterilizer for microwaves then you must adhere to the directions printed in the label on your pacifier. Do not put the pacifier in the microwave for an extremely long period of time.
- Once you’ve finished cleaning and sterilizing your Pacifier, allow it to dry. It is best to shake out all extra water that has accumulated in the pacifier, and then allow it to air dry. In this way, you’ll be in a position to dry it more quickly. If you’re using a sterilizer with a dryer, there is no need to be concerned about it. The sterilizer will take charge of it.
- After you have completed the cleaning process, you’ll have take care of the storage process, too. It is not necessary to make use of a sterilizer all time. Therefore, between use, you can put it in an airtight bag or zip bag to ensure that the pacifier is secure to your child. There will be no problems with bacteria or any other concerns for your baby.
This is the most simple method to clean and sterilize the pacifier of your baby. It can be done at home, without the need for specific equipment or sterilizers at your home. Hot water can help you.
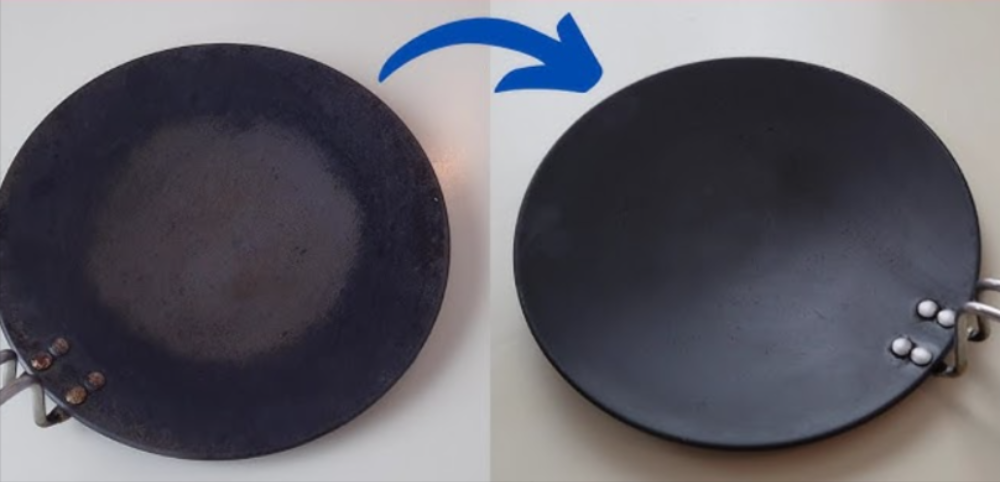
You should be aware about non-stick tawa. It is a crucial kitchen appliance in every home. It appears that the work of your kitchen is not complete without a non-stick tawa. A non-stick tawa will make your cooking more smooth and delicious in a variety of ways. You’ve probably noticed that in all restaurants, non-stick tawas are utilized. They come in a variety of size and shape. You can choose the best one for your needs. The non-stick tawa are made from various metals. Steel and aluminum are the most sought-after ones.
Tips to clean the nonstick surface of a tawa
If you’re using a non stick tawa, it is essential to know the proper method of how to clean and maintain the tawa. In the next section you will be taught how to keep the tawa spotless. Let’s try to figure how to do it.
- It is essential to be aware that non-stick tawas have an exclusive coating. The coating allows cook using less oil. Even food items won’t stick to the tawa. In order to do this, be sure to thoroughly clean the tawa after using it.
- Do not place the pans or pots on tops of the non-stick tawa. It can cause damage to the tawa to a significant extent. It can be seriously damaged.
- Use silicone or plastic or other materials to clean the tawa. Don’t use other substances to clean the tawa. They will leave scratch scratches on your tawa. The scratch marks can cause obstructions while cook on the stove. It is your responsibility to ensure the durability of your tawa.
- It’s fine to adhere to the instruction manual of the user when cleansing the tawa. This will aid in the simple clean-up of your tawa. It is also possible to keep the kitchen appliance with the highest quality possible.
- Do not wash the non-stick tawa by using the dishwasher. It could cause harm for the non-stick tawa.
- Additionally, avoid using steel wools to clean the tawa. They can also harm the tawa and stop your ability to use it.
- Lukewarm water is always a good choice to clean the tawa. Try to follow this procedure for cleansing the tawa. It is best to make use of a soft sponge for washing the tawa. This will aid in the cleaning of your tawa.
How do you clean burned food from tawa?
Your food could get burned when cooking. To get the food that has burned from the tawa, you have clean it using soap water. Leave it there for a few hours. Rinse it off with water. Then, sprinkle some oil and ghee on the tawa using the help of cotton or any other material. The result will be the cleaning process much simpler and much more efficient.
To get rid of the burned food off the tawa, submerge it in water for approximately 10 minutes. Then, you can moisten it with water, and then let it sit for ten minutes. You can also apply scotch brite to take these foods off the pan. It is also possible to apply a thin layer of sodium bicarbonate and allow it to sit for 15 to 20 mins. Rinse it by soaking it in water. The food particles will be eliminated from the tawa.
You can also make use of baking powder, salt with hot water, to create the paste. Apply the paste to the damaged area on the tawa. Then leave the paste on the tawa for a period of time. Clean the tawa with soap and water. Then let it dry, and when it’s dried then apply a small quantity of vegetable oil on the tawa. This is another method to scrub the burned food items on the tawa.
It is now clear that there are many ways to take the food that has been burned off the tawa. It is normal that when cooking, food items can become stuck on the tawa. Sometimes, it is so hard that it takes a reasonable amount of efforts and time get rid of the mess. If you stick to the steps or tricks to get rid of the mess, you will quickly be rid of the problem. It’s now easy and enjoyable to keep the non-stick tawa. In addition, you should consider buying tawas from well-known brands.


Protected: Ozone Clinic Dubai Leading the Wellness Therapy Trend

Protected: Expansion Joint Suppliers in UAE Driving Flexible Infrastructure Growth

Protected: Best Urologist In Dubai The Rise of Advanced Care and Lasting Relief

Protected: Liposuction in Dubai The Rise of Sculpted Confidence and Modern Contouring

Top 10 Popular OEM Companies In India
-

 Entertainment7 years ago
Download Hindi Mp3 Songs
-
 Business8 years ago
How payday loans are becoming the preferred mode of choice
-
 SEO & Digital Marketing8 years ago
Generate More Views on Your Instagram Profile with Cool Graphic Designs
-

 Auto7 years ago
What are Some Budget Friendly Bikes in India?
-

 Entertainment7 years ago
Tips and tricks for safe winching
-

 Entertainment7 years ago
How might Super Hero Thor going to help other Avengers in the Avenger4?
-

 Entertainment7 years ago
Amusement and Water Parks to Visit in Delaware
-

 Entertainment7 years ago
Top Websites To Download Bollywood Songs And Music Free Online